9 Android settings that'll strengthen your security
Android's own native security options aren't always obvious — but they're absolutely worth your while to embrace and understand.

You might not know it from all the panic-inducing headlines out there, but Android is actually packed with powerful and practical security features. Some are activated by default and protecting you whether you realize it or not, while others are more out of the way but equally deserving of your attention.
So stop wasting your time worrying about the Android malware monsterdu jour and which security company is using it to scare you into an unnecessary subscription, and take a moment instead to look through these far more impactful Android security settings — starting with the core elements and moving from there into some more advanced and easily overlooked options.
Ready?
1. Google Play Protect
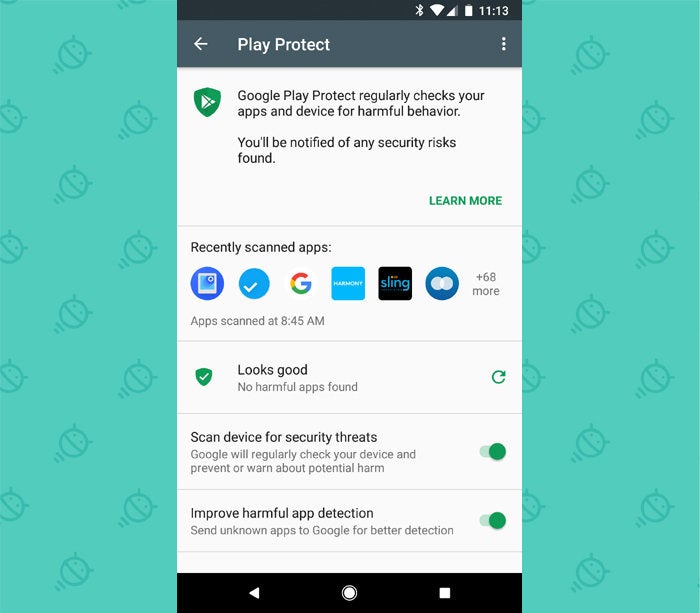
Unless you (or someone else) inadvertently disabled it at some point, this first feature should be up and running on your Android phone already — but it's worth double-checking to make sure. Google Play Protect is Android's native security system that, among other things, continously scans your phone for any signs of misbehaving apps and warns you if anything suspicious emerges.
(And yes, it does sometimes fail to detect shady players immediately — something that gets played up to a comedic degree in those misleading marketing campaigns — but even in those instances, the real-world threat to most users is typically quite minimal.)
You can confirm Google Play Protect is working on your device by looking in the Security (or Security & Location) section of your system settings. Tap the line labeled "Google Play Protect," then make sure all the toggles are activated and everything shows up as being active.

2. Find My Device
Whether you've simply misplaced your phone around the house or you've actually lost it out in the wild, always remember that Android has its own built-in mechanism for finding, ringing, locking, and even erasing a device from afar.
Like Play Protect, the Android Find My Device feature should be enabled by default. You can make sure by heading into that same Security section of your system settings and tapping the line labeled "Find My Device." Double-check that the toggle at the top of the screen is turned on.
If you ever need to track your phone down, just go to android.com/findfrom any browser or do a Google search for "find my device." (There's also an official Find My Device Android app, if you have another Android device and want to keep it standing by and ready.)
As long as you're able to sign into your Google account, you'll be able to pinpoint your phone's last known location on a map and manage it remotely within seconds.
3. Smart Lock
Security is only useful if you actually use it — and given the extra level of inconvenience it often adds into our lives, it's all too easy to let our guards down and get lazy after a while.
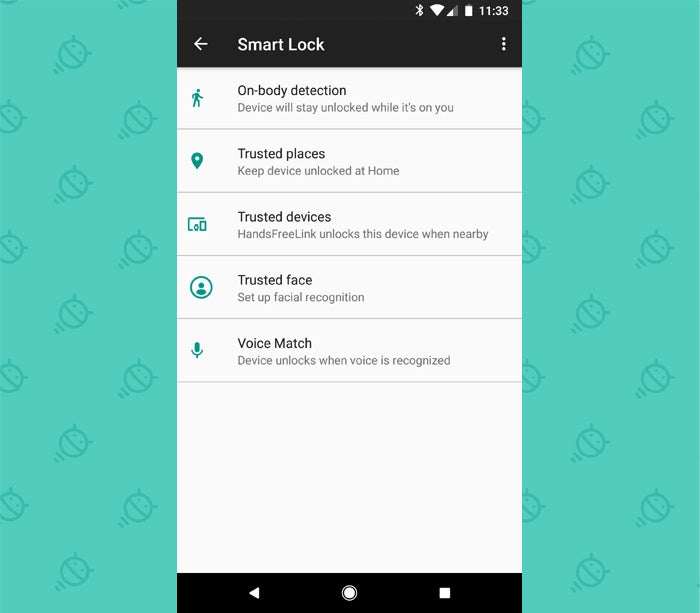
Android's Smart Lock feature is designed to counteract that tendency by making security a teensy bit less annoying. It can let you automatically keep your phone unlocked whenever you're in a trusted place — like your home, for instance — or whenever you're connected to a trusted Bluetooth device, like a smartwatch or your car's audio system.
Look for the "Screen Lock" option in the Security section of your system settings to explore the possibilities. (And if you ever find the Trusted Places part of Smart Lock isn't working reliably, by the way, here's the 60-second fix.)
4. Two-factor authentication
This is technically a Google account feature and not specific to Android, but it's very much connected to Android and your overall smartphone security picture.
You know what two-factor authentication is by now, right? And you're using it everywhere you can — especially on your Google account, which is probably associated with all sorts of sensitive data?
If you aren't, now's the time to start. Hustle over to the Google section of your phone's system settings, tap "Sign-in & security" and then "2-Step Verification" and follow the steps to set things up.
I'd recommend using the Google prompt as the default method, followed by an authenticator app. For the latter, you'll need to download and set up an app like Google's own Authenticator or the more flexible Authy to generate your sign-in codes.
It'll add an extra step into your sign-in process, but this is one area where the minor inconvenience is very much worth the tradeoff for enhanced protection.
5. Safe Browsing
Chrome is the default Android browser — and as long as you're using it, you can rest a little easier knowing it'll warn you anytime you try to open a shady site or download something dangerous.
Chrome's Safe Browsing mode is enabled by default; you can confirm it's working on your phone by looking in the Privacy section of Chrome's settings and seeing that the box next to "Safe Browsing" is lit up and checked.
6. App permissions
We just talked about this one the other day: Facebook's ongoing data debacle is a powerful reminder of how important it is for us all to be aware of the types of access we've granted to different apps over the years. Facebook had the ability to monitor and log calls and messages because, plain and simple, people gave it that ability. And it's not the only app that's asked for and been granted long-ago-forgotten levels of permission.
The good news, though, is that Android makes it incredibly easy to pull up common system permissions and see which apps have access to them. From there, all it takes is a single tap to take an app out of the list and cut off its access entirely.
Follow the steps here to check up on your device's app permissions and make any necessary adjustments along the way.
7. Screen pinning
One of Android's most practical security options is also one of its most hidden features. I'm talking about screen pinning — something introduced way back in 2014's Lollipop era and rarely mentioned since.
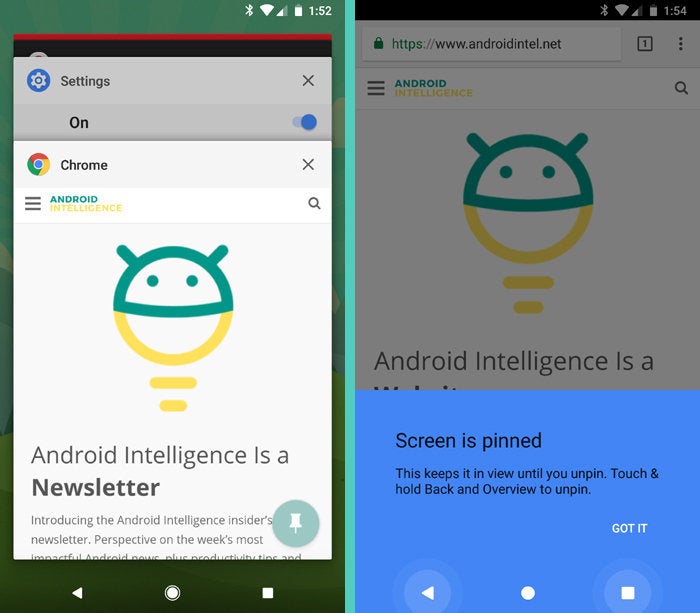
Screen pinning makes it possible for you to lock a single app or process to your phone and then require a password or fingerprint authentication before anything else can be accessed. It can be invaluable when you pass your phone off to a friend or colleague and want to be sure they don't accidentally (or maybe not so accidentally) get into something they shouldn't.
To use screen pinning, you'll first need to activate it by opening that trusty ol' Security section in your main system settings and then finding the line labeled "Screen pinning." Turn the feature on and also make sure the toggle to "Ask for unlock pattern before unpinning" is activated.
Now, the next time you're about to put your phone in someone else's hands, first hit the Overview button — the square-shaped icon next to Back and Home — and then push the on-screen cards up as high as they'll go.
Tap the pushpin icon in the lower-right corner of the bottommost card, and your most recently opened process will then be locked to your screen. After that, you'll have to hold the Back and Overview keys together and then unlock your device before anything else can be accessed.
8. Lock screen limitations
Speaking of locking your phone, Android typically shows notifications on your lock screen by default — which means the contents of messages you receive might be visible to anyone who looks at your device, even if they can't unlock it.
If you tend to get sensitive messages or just want to step up your security and privacy game, you can restrict how much notification info is shown on your lock screen by opening "Lock screen preferences" within the Security section of your system settings.
9. Emergency contact info
Sure, Find My Device can help you track down and locate a lost phone — but you might get a missing device back even faster with the help of a fellow human.
Give people a chance to do the right thing by adding an emergency contact that can be accessed and dialed with a few quick taps from your lock screen. Go to the Users & Accounts section of your system settings, then scroll all the way down to the bottom until you see a line labeled "Emergency information." Tap it and follow the prompts to add an emergency contact — a close friend, family member, significant other, random raccoon, or whatever makes sense for you.
The only challenge is that the emergency contact info isn't exactly obvious or easy to find on the lock screen — go figure — so anyone who picks up your phone may not ever get to it.
But wait! You can increase the odds considerably with one extra step: Head into the Security section of your settings and tap "Lock screen preferences." Tap the line labeled "Lock screen message" and enter something along the lines of: "If you've found this phone, please swipe up and then tap 'Emergency' and 'Emergency Information' to notify me. Thank you!" (Hey, it can never hurt to be polite.)
That message will then always show up on your lock screen — and as an added bonus, if there's ever an actual emergency, you'll be ready for that, too.
One more thing...
Now that you've got your Android security settings optimized and in order, take 10 minutes to perform an Android security audit. It's an overall checkup I've created for the state of security on both your phone and your broader Google account — and it's well worth doing at least once a year.
The best part of this checkup? It's completely painless — and unlike with most preventative exams, removing your pants is entirely optional.


Comments
Post a Comment